文章内容
2019/5/30 16:55:40,作 者: 黄兵
IdenttityServer 4数据表结构
最近一直在研究IdentityServer4,应用与项目中,但是所有的示例都是基于内存加载的方式,具体代码如下:
// Adds IdentityServer.
services.AddIdentityServer()
    // The AddDeveloperSigningCredential extension creates temporary key material for signing tokens.
    // This might be useful to get started, but needs to be replaced by some persistent key material for production scenarios.
    // See http://docs.identityserver.io/en/release/topics/crypto.html#refcrypto for more information.
    .AddDeveloperSigningCredential()
    .AddInMemoryPersistedGrants()
    // To configure IdentityServer to use EntityFramework (EF) as the storage mechanism for configuration data (rather than using the in-memory implementations),
    // see https://identityserver4.readthedocs.io/en/release/quickstarts/8_entity_framework.html
    .AddInMemoryIdentityResources(Config.GetIdentityResources())
    .AddInMemoryApiResources(Config.GetApiResources())
    .AddInMemoryClients(Config.GetClients())
.AddAspNetIdentity(); // IdentityServer4.AspNetIdentity. .AddInMemoryApiResources(Config.GetApiResources()),加载API配置,这个完全是没法在项目中使用,难道增加一个api,之后需要重新编译,部署?
但是官方完全没有找到配置对应的数据库字段,只能通过慢慢的摸索来判断。
public static IEnumerableGetApis() { return new List { new ApiResource("api1", "My API") }; }
这里对应的是这个表:

ApiResources这张表存储了对应的API名称。
这里有关于这个字段的对应描述:API Resource
之后再看看Client的一下相关配置:
.AddInMemoryClients(Config.GetClients()),加载客户段的配置(一般是SPA单页应用),具体增加内容如下写法:
public static IEnumerableGetClients() { return new List { new Client { ClientId = "client", // no interactive user, use the clientid/secret for authentication AllowedGrantTypes = GrantTypes.ClientCredentials, // secret for authentication ClientSecrets = { new Secret("secret".Sha256()) }, // scopes that client has access to AllowedScopes = { "api1" } } }; }
这个主要是存储客户端的一些信息,对应的表是这张表(Clients):
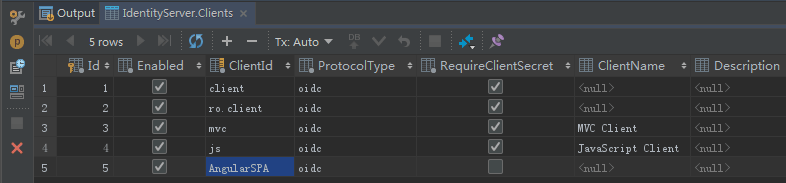
上面代码中Secret("secret".sha256()),通过sha256加密“secret”,加密的结果保存在这张表(ClientSecrets):
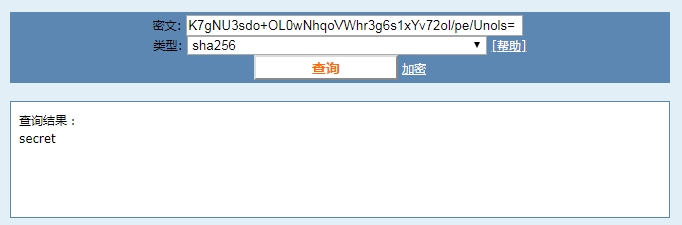
看一下这张表的内容:

同时这张表里面的Value是可以解密的,我通过这个网站(CMD5)解密之后内容如下:
关于这张表的详细字段解释可以查看这篇文章:Client
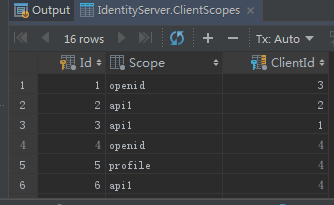
AllowedScopes = { "api1" }定义了Js应用程序可以访问的资源,也就是上面对应的API资源。
看一下这张表(ClientScopes),具体内容如下:
还有一个是Grant Types(授权类型),主要的作用是:授权类型是指定客户端如何与IdentityServer交互的方式。
// Clients want to access resources. public static IEnumerableGetClients() { // Clients credentials. return new List { // http://docs.identityserver.io/en/release/reference/client.html. new Client { ClientId = "AngularSPA", AllowedGrantTypes = GrantTypes.ResourceOwnerPassword, // Resource Owner Password Credential grant. AllowAccessTokensViaBrowser = true, RequireClientSecret = false, // This client does not need a secret to request tokens from the token endpoint. AccessTokenLifetime = 900, // Lifetime of access token in seconds. AllowedScopes = { IdentityServerConstants.StandardScopes.OpenId, // For UserInfo endpoint. IdentityServerConstants.StandardScopes.Profile, "roles", "WebAPI" }, AllowOfflineAccess = true, // For refresh token. RefreshTokenUsage = TokenUsage.OneTimeOnly, AbsoluteRefreshTokenLifetime = 7200, SlidingRefreshTokenLifetime = 900, RefreshTokenExpiration = TokenExpiration.Sliding } };
AllowedGrantTypes = GrantTypes.ResourceOwnerPassword,这里定义了:资源所有者密码授予类型允许通过将用户的名称和密码发送到令牌端点来代表用户请求令牌。这就是所谓的“非交互式”身份验证,通常不推荐使用。
关于Resource Owner Password Credentials 授权和 Client Credentials 授权,可以看这篇文章。
更多的授权方式可以参考这篇文章:Oauth2.0几种授权方式总结
由于需要通过浏览器访问令牌,设置了:AllowAccessTokensViaBrowser = true,
关于这一节的内容,可以详细参考这篇文章:Grant Types
RequireClientSecret = false,定义了指定此客户端是否需要密钥才能从令牌端点请求令牌。
上面讲的都是js客户端的一些程序内部结构,下面看一下API请求的一些数据表结构。
下面是增加API资源的一个写法:
new ApiResource
{
    Name = "api1",
    DisplayName = "Some API 1",

    Scopes =
    {
        new Scope()
        {
            Name = "api1",
            DisplayName = "Some API 1"
        }
    }
}
Name和DisplayName开头已经讲了,下面看一下Scopes。
Scope的作用是:在简单的情况下,API只有一个范围。但是在某些情况下,您可能希望细分API的功能,并让不同的客户端访问不同的部分。
ApiScopes这张表关联了以上的代码,表的具体结构如下:

Name="api1"在数据表中通过外键关联ApiResourceId,定义了API的作用域。
下面看一下一个实际的配置实例,这个主要是使用Flask API,保护API资源,定义如下:
JWT_OIDC_WELL_KNOWN_CONFIG = os.environ.get('JWT_OIDC_WELL_KNOWN',
                                                'https://oauth.pdflibr.com/.well-known/openid-configuration')
    JWT_OIDC_AUDIENCE = os.environ.get('JWT_OIDC_AUDIENCE', 'keycloak-client')
JWT_OIDC_CLIENT_SECRET = os.environ.get('JWT_OIDC_CLIENT_SECRET', 'keycloak-client-secret')这里主要是使用了flask-jwt-oidc,首先定义了发现文档,之后定义了API resource Name(JWT_OIDC_AUDIENCE),之后又定义客户端加密(JWT_OIDC_CLIENT_SECRET),其实这个不用定义也可以。
关于这些详细信息,可以参考这里:Protecting APIs
参考资料:IdentityServer4 Doc
评论列表